# Install Ixivault
All values shown in this guide are examples and have been deleted afterwards. If you encounter a problem during installation, first retry the installation due to known issues with Azure Marketplace. If you have any questions, have a look at the F.A.Q. page, or feel free to reach out to the SynerScope Support Team (opens new window).
# Pre-requisites
We recommend this installation is performed by a certified Azure engineer. The subscription should have payment by invoicing enabled. Free and sponsorship subscriptions are not supported and credit card paid subscriptions do not allow for scale-out compute.
Ixivault needs resource providers to be enabled on subscription level. This will allow these specific resources to be deployed. Go in the Azure Portal to your subscription and select "Resource providers".
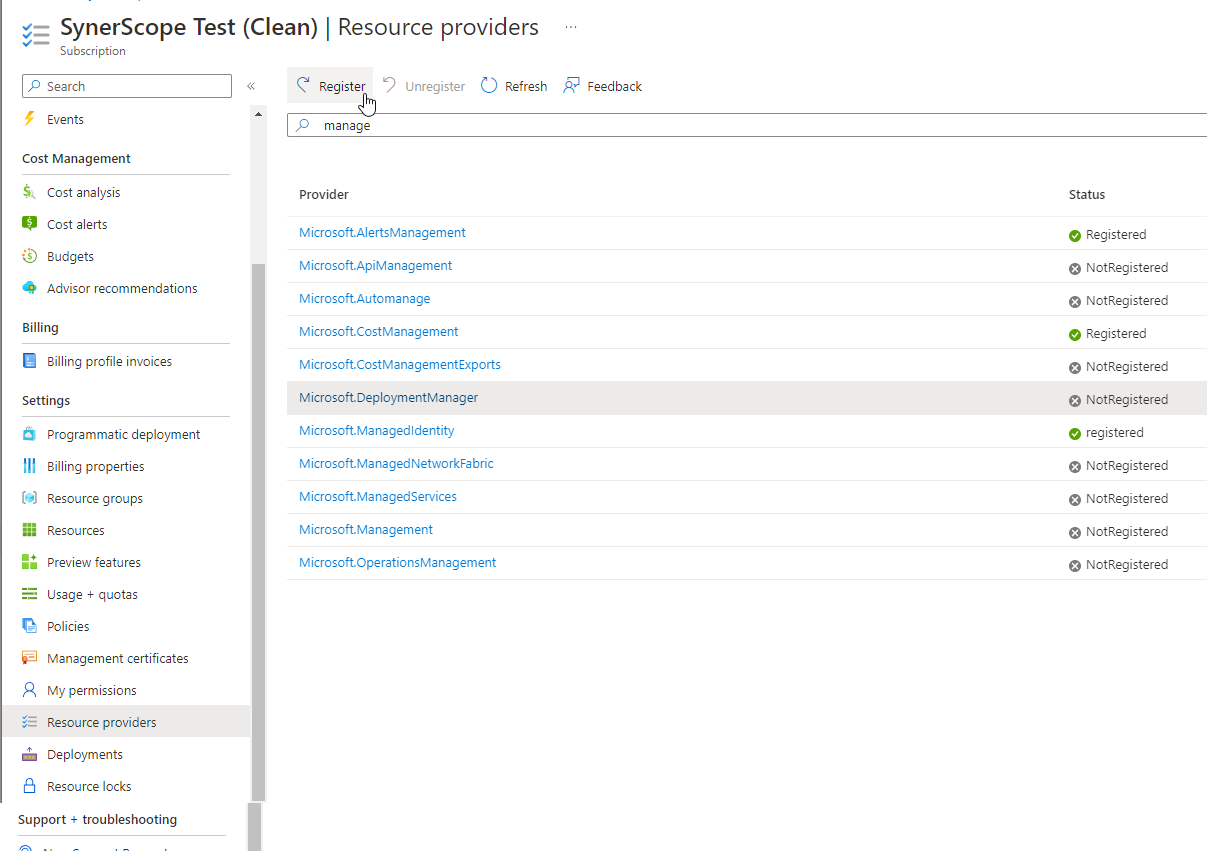
The following resource providers need to be enabled:
- Microsoft.Batch
- Microsoft.Compute
- Microsoft.ContainerInstance
- Microsoft.DevTestLab
- Microsoft.DBforPostgreSQL
- Microsoft.EventGrid
- Microsoft.Insights
- Microsoft.KeyVault
- Microsoft.ManagedIdentity
- Microsoft.Network (only for VNET)
- Microsoft.OperationalInsights
- Microsoft.PolicyInsights
- Microsoft.ServiceBus
- Microsoft.Storage
- Microsoft.Web
# Installation steps
Find and pick the desired Ixivault installation.
After selection you'll be greeted by the basic overview.
Fill in the details similar to what is visible in the screenshot below.
WARNING
The location/region must be the same for the Resource Group and the Managed Resource Group. Ixivault is currently restricted to the regions available in the installation wizard. If you want to use another region, please contact SynerScope Support Team (opens new window).
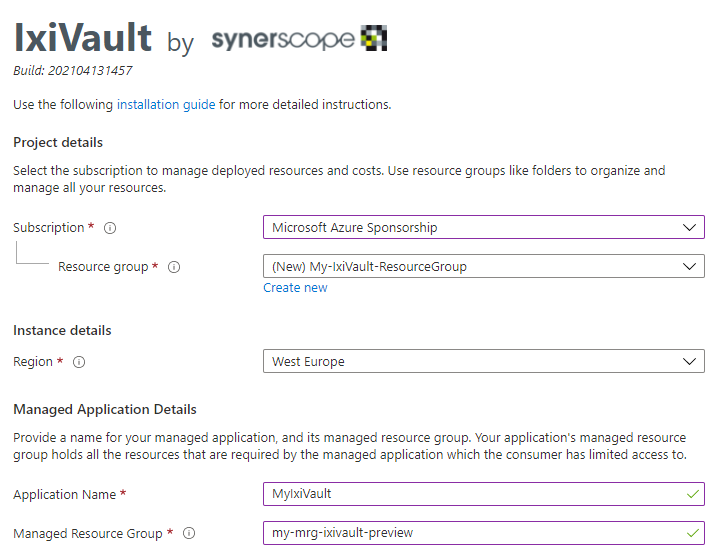
Select "Next: Ixivault >" at the bottom.
Preflight checks are performed to make sure Azure resources can be deployed in your tenant. Depending whether or not a resource can be deployed a green checkmark or a red cross appears.
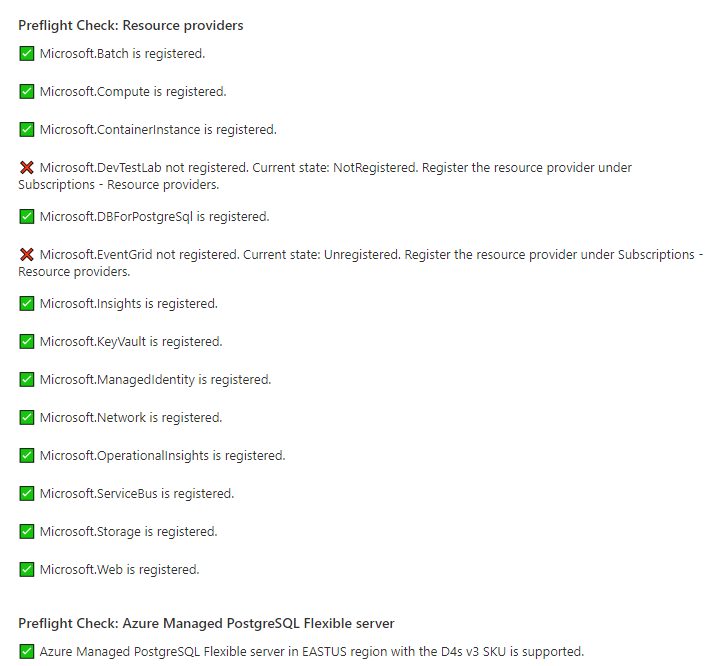
In case a red cross for a preflight check appears, instructions are shown. For raising Quotas for specific components, like Azure Managed PostgreSQL Flexible Server see Quotas.
Select "Next: Settings >" at the bottom when all preflight checks are green.
Pick the desired update ring this installation should be part of.
For the service principals you can either "Select Existing" or "Create New".
- For creating new principals see Create new service Principal.
- For selecting existing principals see Select existing service principal.
If you have followed either of the above paths you should now be presented with two entry fields, one for a "Password" and one for an "App registration Object ID". Paste the copied secret for the Rest API principal in the "Password"-field and the copied Object ID in the "App registration Object ID"-field. Repeat this process for the remaining principals.
With all the principals supplied your page should look similar to this:
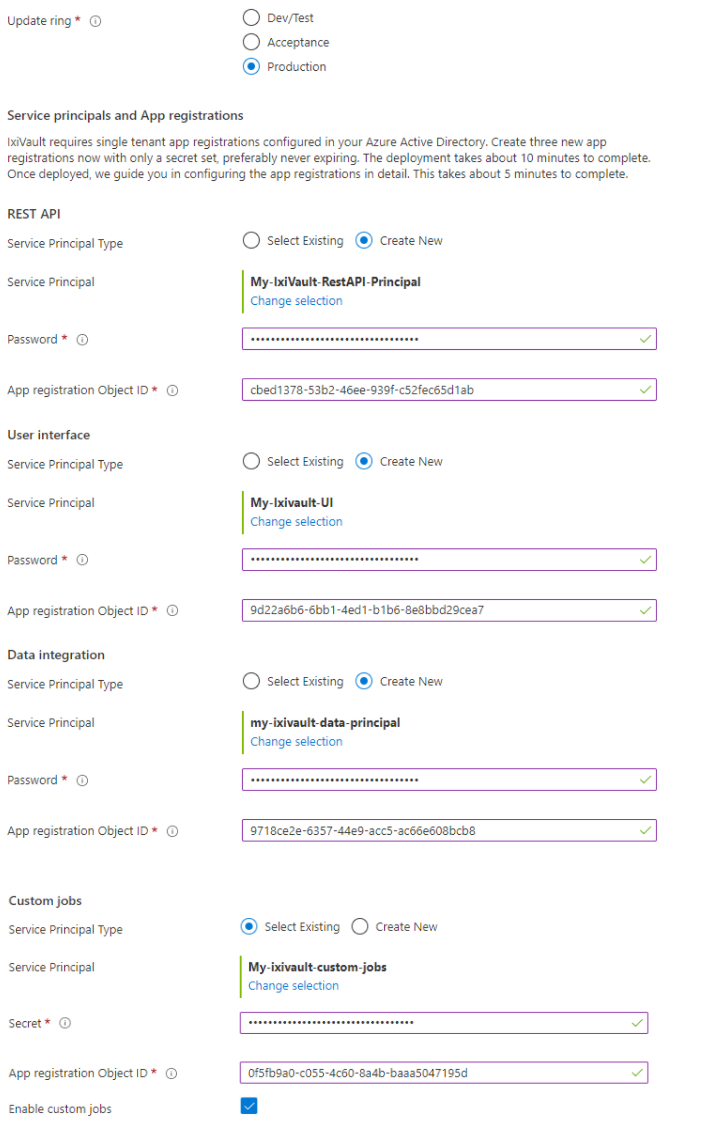
When everything is correct press "Next: Network >" at the bottom.
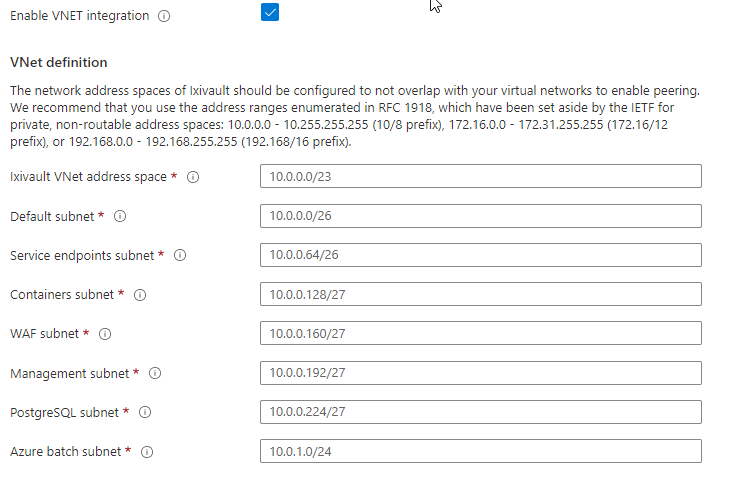
Choose whether or not virtual network (VNET) integration should be enabled. This is the only moment that you can choose VNET integration. For support on configuring the network definitions see Virtual network integration.
When everything is correct press "Next: Encryption >" at the bottom.
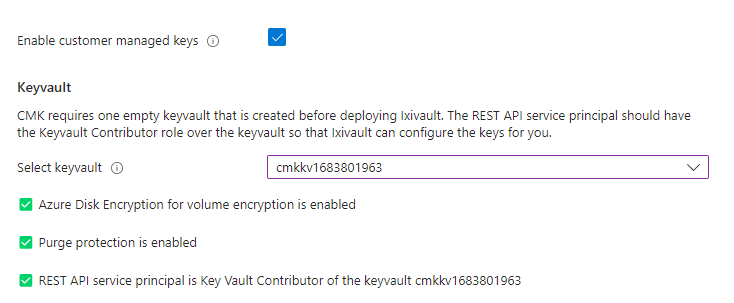
Choose whether or not customer managed encryption keys (CMK) integration should be enabled. This is the only moment that you can choose CMK integration. For support on configuring the network definitions see Customer managed encryption keys integration.
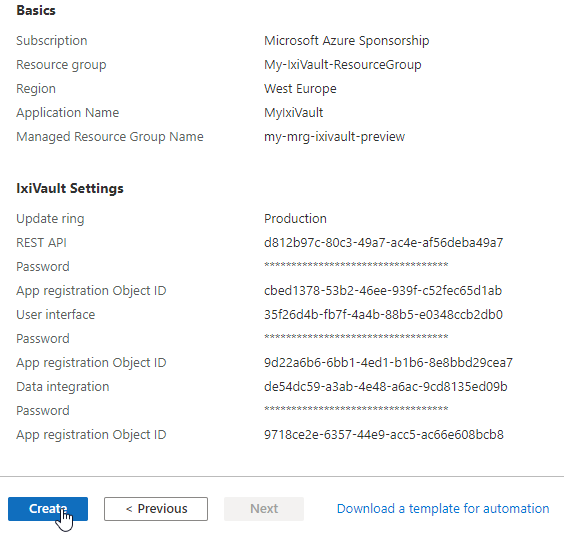
In the "Review + create" page you need to agree to the conditions stated on the page. Please read them carefully and tick the box that reads "I agree to the terms and conditions above" when you agree.
When all is in order you can select the "Create"-button at the bottom to start deploying your Ixivault instance.
- During the deployment of the managed application an orange bar is shown with "The application is still being provisioned. Some functionality may not work.". The deployment takes 25 minutes or 45 minutes with vnet enabled. Once the managed application is deployed this orange bar disappears and you can navigate to your Ixivault application with the URL provided in the output of the 'Managed App' > 'Settings' > 'Parameters and Outputs'. In case the app registrations are not configured correctly, the deployment is not complete and a specific error is shown in this panel as well.
TIP
If the URL is not in the output for whatever reason, the Ixivault UI URL is named using the following convention (prefix)(random_characters)ui.azurewebsites.net.
E.g. prdorvpmkdotjzbcui.azurewebsites.net where 'prd' is the prefix and 'orvpmkdotjzbc' is the random character set.
The URL can still be found by navigating to the Managed Resource Group and copying the name of the UI service itself. The service's name corresponds with the prefix and random characters as in the example above.
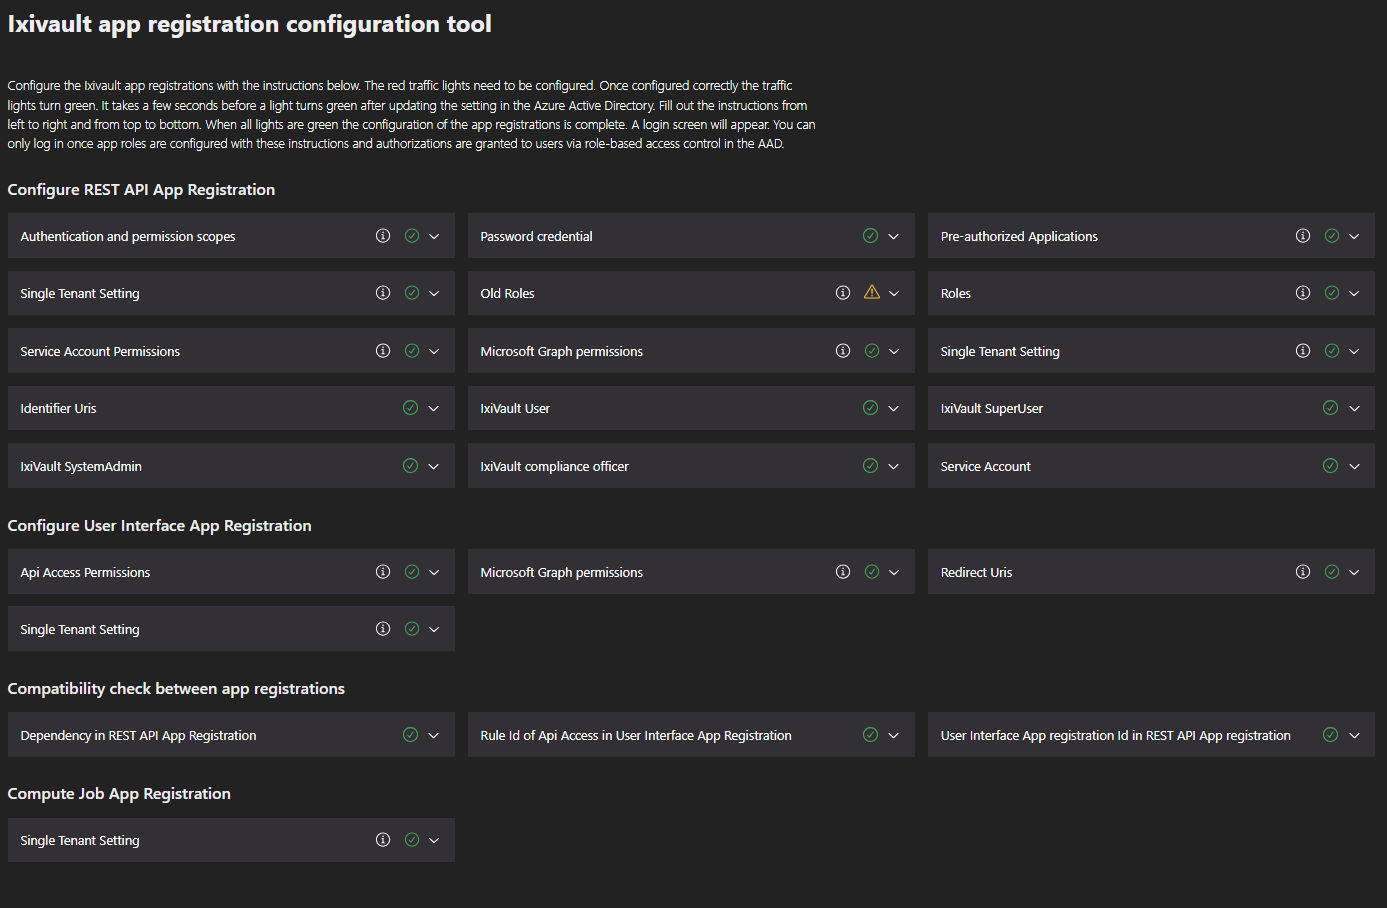
- When the UI of Ixivault is shown for the first time your system administrator needs to complete the final configuration steps. This should take about 5 minutes to walk through. When everything is completed all the red dots will turn green and you'll be greeted with a 'Login'-button. You should be able to login when the Role assignments are configured and your user is authorized to use Ixivault by your system administrator.
# Post-installation steps
Ixivault makes use of Azure Batch Account Service. In order to run to your needs you may need to request a quota increase from Azure after deployment for Azure Batch.
TIP
Larger scale deployments are possible by raising these quotas. Be aware of additional business justification to get these quotas raised to the Azure capacity management team. When you use an Azure subscription with credit card payment, these quotas can be raised to at most 20 cores for each of these series. The pools in Ixivault should be configured with 1 or 2 nodes at most. Invoice payment is required to benefit for full-scale deployments.
# Role assignments
Once Ixivault is configured, the last step is to assign App roles to users that are authorized. For Azure Active Directory with a P1 license and up you can configure the app roles to a group and apply standard role-based access control, assigning users to this group.
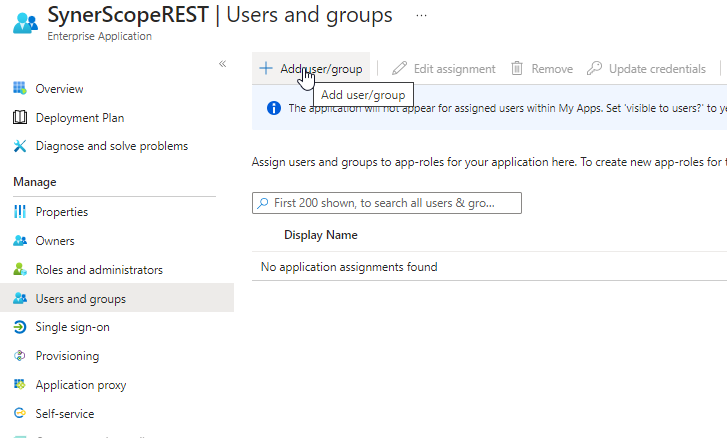
Go in the AAD to the Enterprise Application for the "RestAPI" and go to "Users and groups".
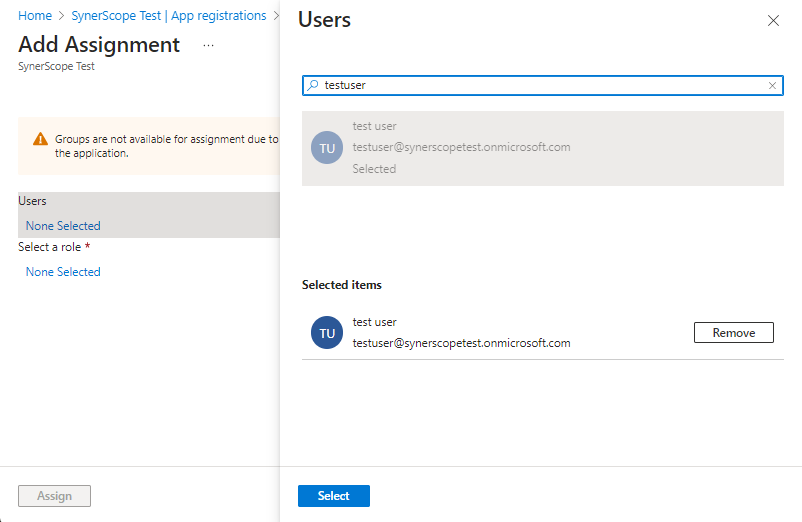
Choose the user or group to assign the role to and click on "Select".
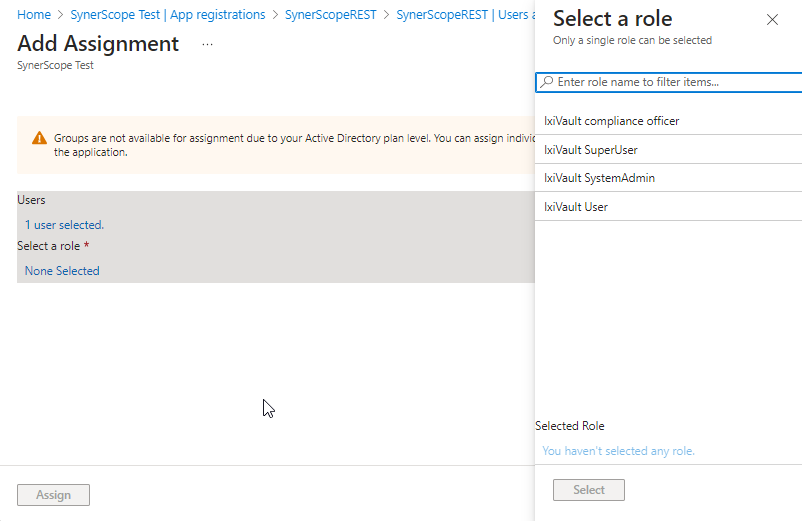
Choose the role to be assigned to the user or group and click on "Select". Finally, click on "Assign".
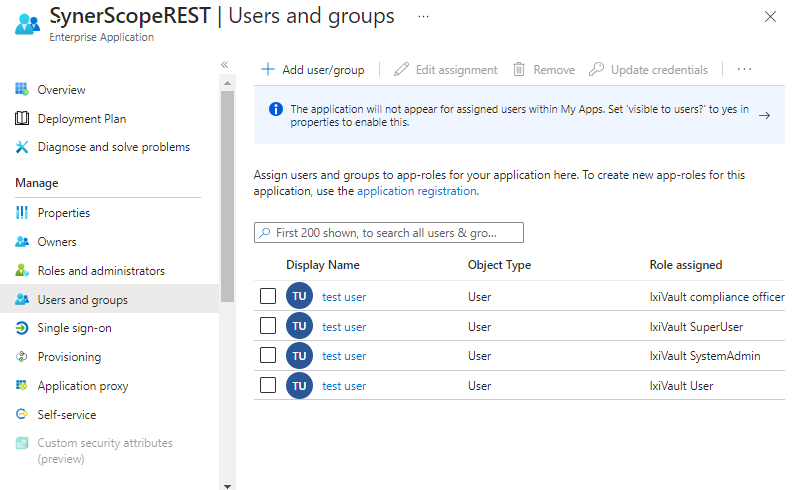
Repeat this for all roles. It can take a few minutes before the user can login in to Ixivault.
Quotas →